St. Johnsbury Silo
Project Overview
The opportunity to restore this silo was a fascinating deviation from our usual work. We were initially contacted by an insurance company seeking an estimate for the homeowners claim for the collapsed roof. We were glad to oblige with the estimate but assumed that we would not be doing the work as there was no restorative joinery involved. After examining the structure, we found ourselves fascinated at its unique construction along with the challenge of recreating the roof.
Most of the round wooden silos that we have seen are composed of vertical members held tightly in place by the use of metal rings. This silo, however, is composed of rough sawn, two by four inch vertical studs spaced roughly one foot apart. The horizontal sheathing consists of two layers of six inch tall by 1/2″ thick boards on both sides of the studs. Although this feature in itself struck us being unique, our real fascination was with the construction of the roof. The roof was originally constructed as a cone made of tapered staves without any rafters or additional structural support. Each of the two inch thick studs was fastened to the plate, adjacent studs and a two foot diameter wooden disk set a few inches below the peak.
To begin the restoration, we had to remove several layers of the horizontal sheathing from the top and bottom of the silo, mostly on the interior. Much of the sheathing on the top and bottom had rotten or become very brittle. Many of the studs had damage to the ends requiring sisters to be added to about a third of the studs at the bottom of the silo. The tops of the studs had been badly damaged when the plate sections had been torn away during the collapse. We added sisters to all of the stud tops in order to have adequate material to fasten the new plates to.
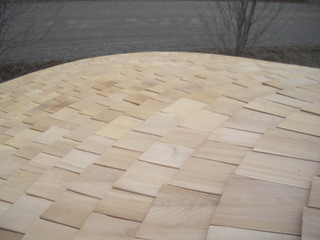
We fabricated new custom curved sections of two inch thick stock to re-create the original plate. The fabrication of the new roof staves required us to build a sliding jig with almost thirty feet of track to ensure uniformity while ripping the new staves. The new roof is comprised of almost one hundred forty staves that taper from roughly seven inches at the eaves to a quarter of an inch at the peak. A lot of the fun that we had from this project was in the calculating the position of the wooden disk at the top. The height of the disk determines the pitch of the roof as we set the staves. Through examination of the nail holes on the old staves and corroboration with a few old pictures of the silo before the collapse, we were able to locate the disk at the correct height and position. As the body of the silo was rather warped and irregular, any mistakes in the calculation of the disk’s location would not have been immediately self evident nor easily corrected without scrapping materials.
As we began to set the staves, the load of the materials was distributed between the plate and the disk, which rested on a cribbing pile on our staging. In theory, we knew that as the cone began to take shape that the load of the staves would be transferred laterally from each stave to the next and ultimately to the plate with no need for the center disk once the cone was completed. In spite of that knowledge, we couldn’t help but wonder if there would be any settling of the cone once the cribbing was removed from beneath the center disk. Sure enough, when the last stave was set, the cribbing beneath the disk slid out with ease and no movement was detected in the twenty-two foot diameter cone.
The silo proved to be a truly rewarding project for us. We now have a renewed appreciation for the engineering and construction of these fascinating structures and look forward to our next opportunity to save one.